The Plan This Week: Ch-ch-ch-ch-changes.

This_Week_Homeschool_345


So, this week we’re having to do a whole bunch of things. We ended up taking the rest of last week off, because McHusband decided to go back to the oil fields and left for Pennsylvania last night. While I’m sad to see him go, I’m happy because it’s what he likes doing: working outside, working hard, and honestly? Though he won’t admit it, I think he secretly enjoys working in the oil fields. So, he’s going up there and the job that he’s taking is a huge stepping stone to bigger and better things for him, as well as for us. 

So, this week, we’re having to do last week’s work, as well as try to stay on a sorta schedule, meaning, we may have to double-time on some of the things. While we will have more than enough days at the end of the year, I want to be able to have some freedom to take weeks off when McHusband is home. 

On the outside-of-homeschool front: this is the week that I’ll be signing the older two kids up for different activities. Daughter really wants to do dance, while the Oldest Son wants to do gymnastics. So, all day I’ve been making phone calls and trying to track people down to make that happen, since around here, everything begins either this week or next. 

So, today, so far, we haven’t even gotten around to school yet, because it’s been one of *those* days, which it always is the first day that McHusband is gone. 

I’m also going to a homeschool co-op meeting tonight for a group close to our home, and hoping that we can get involved in that as well, since the kids really want to interact with other homeschooled children. 

Oh, and Friday we have a watercolor art class that we are going to, so that should be fun. 

What’s your week looking like? 
Oopsy.

I’m not perfect. 

I just wanted to let y’all know that up front. 

I’m also kind of a “space cadet” — I tend to forget things pretty quickly and easily, and I mind-dump more than I care to admit. 

So, with the move and everything, I’d forgotten that I still had things that I needed for homeschooling. I remembered the big things. I needed the student sheets and teacher’s manual for My Father’s World. I needed my daughter’s activity book for LLATL. I need their math curriculum.

I forgot to make a list of all the books I’d need to go along with LLATL. 

So, we’re taking an impromptu break this week (not the whole week, just until the books get here), since I don’t have everything we need for the week. 

You would think, with a planner, that I would have everything ready to go, but, as I said, I’m not perfect. 

So, hopefully your week is going better than mine. 🙂

Hello, please come on in….

Or, the grand tour.* 

(Please excuse the mess. Or don’t. Either way, there’s not much your {or I} can really do about it.)

So, here’s what our homeschool room looks like so far this year. 

IMG_1202

I know it’s a mess, and that bed looks a little out of place, but it’s really working for us. I just have to find a place for all those stray books. If you’ll notice, I have put up the white board and cork board since the last photo, and this morning, we finally set up our timeline up, which I’m so proud of. 

IMG_1201 IMG_1200IMG_1199

Yeah, I know, it’s a timeline. It’s ridiculous to be as excited about it as I am, but I love it. I love that we can see history in such a great way and I love that the kids are able to kind of see the relation between events in time.

It’s just yarn stretched out with thumbtacks and the pictures from the My Father’s World curriculum, but it serves it’s purpose. 

Hope you enjoyed the small tour. More to come as soon as I get everything put away. Maybe even some organization stuff! 🙂 


*Ok, ok, so the tour isn’t exactly grand, but you know what I mean. 

Oh. Hi there.

Wow, I’m horrible. I can seem to keep at this whole blogging thing for very long, can I? I know. I know.

But, let’s take a little journey over what’s happened in our family since I last blogged.

We moved. 

We’re no longer Okies {sad face} — we’re Floridians again! I mean, technically, I’ve always been a Floridian (born and raised!) but we’re just back home, now. So, yay! It’s been a blast. I forgot how much I enjoyed swimming every weekend and not having to freak out every time a thunderstorm came up on the radar. It’s been lovely.

Husband lost his oil field job.

But, thankfully, has found another industry, and another job, and will be home every night and off weekends now!

I started nursing school, then quit, and am starting again in August. 

Long story short, the place I decided to go to at first wasn’t upfront or truthful about everything, so I decided to go a different route.

In August, I’ll start finishing up my pre-reqs.

We’ve set up our homeschool room and started school again! 

The house we’re living in used to have a beauty shop in it, which I am slowly turning into a homeschool room. It’s GREAT! I have a video to upload to youtube this week, but for now, here’s a few photos to give you an idea of what I’m talking about.


What the room looked like last week.

What the room looked like last week.

Now, as you can see, this isn’t only a dedicated homeschooling room. We’re living in my Great Aunt’s home with my mom and her husband right now, so this is also a guest bedroom, as well as an extra place to store refrigerators (we have TWO extra ones), a freezer, and my Great Aunt’s stuff. 

Although it’s not perfect and I would love to have the whole room to spread out in, I’m just so grateful and happy to have a room to school in. It’s fantastic. 

IMG_1155

Here’s a closer picture of the shelves. These metal shelves make horrible book shelves, but the book shelf we had in OK couldn’t survive the trip, so we have to buy some new bookshelves soon and replace these. 

This week in our school….

We started My Father’s World Adventures and we love it. The kids learned about the Vikings, they made name necklaces, they learned about the meaning of their names, and we read a few chapters of Winnie-the-Pooh. Not a bad first week. 🙂

IMG_1180

All in all, it’s been a hectic few months, but I promise, for real this time, to be around more. Next week I’ll have the homeschool room video ready, and pictures from some of the stuff we’ve done to it this weekend. 🙂


~Radical Momma

Why I find myself moving to a more Charlotte Mason approach.

FromRadMomsJournal


I bought a book about Charlotte Mason and I am hooked. I’ve always known the overview of the Charlotte Mason approach. You choose living books and you read good literature and you take your kids outside to study nature and TWADDLE IS BAD!

I did not realize that it’s much more than that.

I’m not through with the book yet, because it’s taking me so long to get through it, because I’m stopping to take notes every few paragraphs, and it takes about an hour to read three chapters.

I bought the book on a whim. I’ve been digging more into researching homeschool methods and although I gravitate towards a more Classical style of education, I’m not really fitting into one “box”. So, in digging and deciding which curriculum we’re going to go with next school year, I stumbled across this Charlotte Mason companion book.

When I began to delve into it, I felt so many things begin to open up inside of me. I’ve been talking everyone’s ear off about it ever since I read the first chapter.

I’m going to share with you some of the notes and things that I’ve learned so far.

Charlotte Mason teaches that every day, children need three things: someone or something to love, something to do, and something to think about. 

One third of education, according to Charlotte Mason, is the atmosphere. Set your children up with an inviting atmosphere, and they will learn. Giving them something or someone to love, something to do, and something to think about adds to the atmosphere of the home.

She also talks about instilling habits in your children. One third of education, according to Charlotte Mason, is discipline of habit. What kind of habits do you develop? The habits of attention, obedience, manners, truthfulness, thoroughness, punctuality, etc. You start with one habit a day and you work on it until it becomes a habit and then you move to another.

These things give me hope, while softly showing me that homeschooling isn’t only about what my children learn from books, but also what they learn from me. I cannot expect my children to make their bed every morning if I’m not doing it. I can’t expect my kids to develop the habit of attention if I’m checking out halfway through their conversation with me to check my twitter feed.

She discusses the Will of the child, and how parents keep children’s Wills weak by constant nagging, doing things for them, and not allowing children to feel the consequences (good or bad) from their decisions. Guilty as charged. I would rather save my children from every consequence of their actions than let them feel their own pain or happiness.

I find myself gravitating towards it more and more; the teachings are so truthful and rooted in good. Although I don’t think I’m going to utilize every single thing of the Charlotte Mason approach, because I’m still very eclectic in my teaching style, there is so much that is wonderful about the method of teaching.

Besides the living book aspect, which I’ve always enjoyed, the Charlotte Mason approach is really about showing your child that learning is a lifelong process and allowing them to fall in love with learning. It’s not only about teaching your children things that are in books, but also about teaching them how to have a good character and how to make good choices in their lives. It also exposes your child to culture through art and music, myths and fairytales.

This is an approach to learning that I will definitely be implementing parts of in the future of our homeschool.

Organizing: Homeschool Planner

This school year, I’ve tried the Well-Planned Day planner AND the Erin Condren Teacher Planner. Both of them ended up being total flops. The Well-Planned Day planner, as beautiful as it is, was too much for me. I don’t need my homeschool planner to have as much stuff in it as the planner did. The Erin Condren planner just wasn’t useable for a homeschool setting, and as pretty as it was, I found myself just never using it.

Before my baby was born (in February) — I made my own planner using the ARC system from Staples.

I fell in love.

But, I’m quickly finding out that I don’t have as much time on my hands as I thought I would, and I don’t have time to continually print out my own pages, punch them, design them, etc. etc.

So, this year, I went with the Simple Plan planner. I think I’ve found homeschool planner peace with this one.

Instead of just posting a bunch of different pictures, I’m going to show you my youtube video of both of my planners, because YES I will still be using the ARC system (it’s so great) — but not for planning out our days, but doing other things with instead. I’ll do another video when I figure out what that function is.

The first video is my original ARC planner system.

The next video is about the Simple Plan Planner, which I got from Mardel.


Why I’ve been away, or, How life got away from me.

Oh my gosh.

Life has run away with me and I haven’t been handling everything so great.

First of all, raising four kids is super hard. In case you were thinking of doing it, I’d like you to be prepared: I think I’ve gotten eight combined hours of sleep in the last 2 weeks.

I feel like I’m running in circles doing nothing, but doing it really really quickly.

So, I’m back and I’m going to be revamping this blog, because I’ve decided that I want to make this blog bigger and better than it is.

So, please, if you are still following, please bear with me.

I’m back for good.

Pinterest Win: Squishy Bags

PinterestWin_RadicalMomma

I have no idea what else to call these things, but they are super easy and super fun, and super cheap.

I saw the idea on Pinterest, but never pinned it. I did pin a similar idea here, but this is a little twist on it.

First of all, the first pin I saw said that this is an idea for toddler-age, but my 11 month old seems to really like it, as long as I watch him while he plays with it, because he will try to bite it, and although I double bagged it, I’m scared he’ll break a hole in it, and I don’t want him to get a mouthful of hair gel.

So, here are the supplies.

As you can see, I've already used some of the clear hair gel. I had to make sure this was actually going to work out before taking pictures, LOL.

As you can see, I’ve already used some of the clear hair gel. I had to make sure this was actually going to work out before taking pictures, LOL.

So we’ve got: hair gel, duct tape, glitter and assorted beads. You also need some ziploc-type baggies, that aren’t pictured. All of the supplies, except the duct tape, I got from the Dollar Tree (where EVERYTHING is a dollar!) — I spent a grand total of $10.00 on this project, and I should be able to make ~6 baggies.

Anyways, you have to put the hair gel into the bag. You don’t want to put a whole bunch like I did with the first one I made, you want to put about 1/3 of the hair gel container in it and then add more if necessary.

IMG_0870

I just added more after I’d added the beads and glitter and squished around, to see if more was needed. Side note: this stuff smells *so good*.

IMG_0871

Then, you add your beads and stuff. Just pile it in, zip the top and squish it all around until you’re happy with the consistency of everything.

Then, you squeeze the air out as much as possible and ready the duct tape.

IMG_0872

IMG_0873

Please excuse the quality of these photos. I took them with my iPhone and it was late. Anyway, duct tape the zipper part (I put two layers of duct tape on), if you want to duct tape the whole way around, you could do that, too.

IMG_0874

Then you put that bag inside the other bag and repeat the process of squishing, getting out the air and duct taping. Then, you hand it off to your kid.

And you clean up the mess.

IMG_0875

Or, you could sit absentmindedly squishing it for twenty minutes, thinking about your to-do list and organizing the homeschool curriculum and whether or not you should have another apple before you go to bed.

Not that I did that or anything.

Nope. Not me.

Pinterest Win: Mother’s Day Gifts

Since everyone that could check this site has received their Mother’s Day gifts, I can now post the PICTURES from the craft we did! YAY! 🙂

IMG_0467IMG_0465

This was SUCH a cool project that I had pinned on Pinterest and was so excited to try it. (By the way, do  you follow me on Pinterest? Because you should.) Anyways, that pin led me here, where the explanation was and the art project looked even cooler when I saw how easy it was.

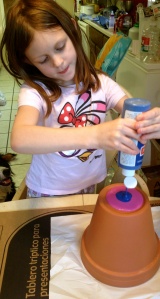
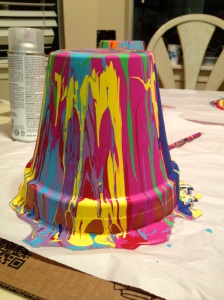
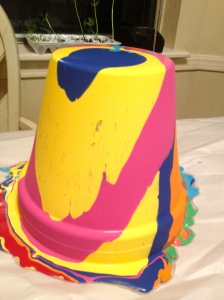
The directions are super easy. You take a terra-cotta pot, turn it over (put something under it to make a space between the lip and whatever it is you’re working over, which is what I should’ve done, but didn’t, because I didn’t think it would be necessary, but it is), and then pour paint on the bottom, while gravity does the rest. Super easy and SUPER fun.

IMG_0470 IMG_0469

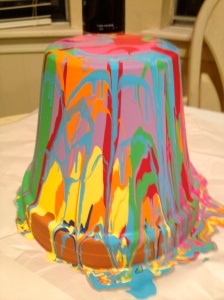
One tip: less is more. As you can see here, the blue is spilling over the pink, which means that the pink won’t be seen. Using less paint and tipping the pot would’ve made sure all the colors would’ve been seen, I think. We’ll do this project again and tweak as we go, so that’s another thing I’d suggest. Tweak as you go.

IMG_0474IMG_0481

We kind of went a little crazy and dribbled pain down the sides and stuff to give it a different sort of look, instead of letting it rainbow down the sides. Because, the rainbow effect is cool, but it takes a while for the paint to pour down the side, which is why I should’ve had the pot on top of something (like a spray paint can, or something) so that I could’ve tipped the pot to make the paint go down faster.

IMG_0480IMG_0478 IMG_0482IMG_0483IMG_0477

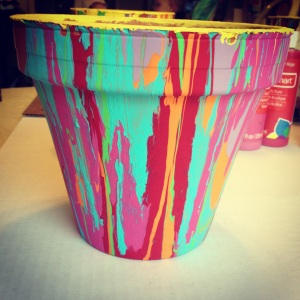
And here they are after they’ve dried for two days, and I painted the lip of the pot yellow, because the paint dried funny.

IMG_0486 IMG_0488 IMG_0492 IMG_0490

These turned out so cool and so pretty that I cannot wait to do this again, only I’ll plan on keeping all of the pots this time instead of just one, because they were all so unique that it was hard to decide which one should go to whom.

It’s a very quick project and, if your kids are able to keep paint from getting everywhere, it’s one that can be done on your kitchen table, which is where we did it, so that bugs and dirt didn’t get mixed in with the paint. Once the paint is dry, just spray the pot with some Polyurethane coating and voila! It’s all done! And pretty! And ready to impress people! Now, I just have to go find some pretty flowers to put in mine.